What are Shopmatic’s User permissions?
Shopmatic’s User permissions allow a Shopmatic seller to create sub-accounts under their own account, so that they may engage different parties to manage different parts of their Shopmatic account.
Example: A designer only being able to access the Edit Site function, a marketing expert managing only the SEO, Tracking and a Sales Manager only being able to manage the Customers and Orders page.
Why do I need to create sub-accounts?
Creating sub-accounts is entirely optional. Creating sub-accounts can be useful if you want different users to have only limited access to your Shopmatic account.
What do I need to create a sub-account?
You only need the email ID and phone number of the sub-account user.
Please note: All sub-account email IDs and phone numbers must not be linked to another Shopmatic account (either as a main account or a sub-account).
Additional note: Only one sub-account should be created at a time. Once the new sub-account has been verified, then proceed to add the next sub-account.
What are the different permissions I can give to a sub-account?
As the main account holder, you can customise the level of permissions that you want to provide to each sub-account.
Simply choose from a drop-down list which permissions you would like to give access to.
There are four main categories, and each has its own further options:
1. Store Builder
-Edit Site
This gives access to all webstore design and content.
Example: The different pages, the company logo, the about us page, the terms and conditions page, etc.
2. Operations
-Products
This gives access to manage all products that are uploaded on the webstore. The ability to add, edit and remove products (new and existing). The ability to bulk upload products, and to categorise the products and etc.
-Customers
This gives access to view all new and existing customers’ data that has been previously collected.
-Orders
This gives access to view and manage all new and existing orders that have been previously collected.
3. Marketing
-Site SEO control
This gives access to manage, each Page’s SEO settings, and also to verify the site ownership via Google Search Console.
-Social Media Tracking
This gives access to manage the tracking tools that are available to use.
Example: Facebook Pixels and Google Analytics.
Please note: To manage Facebook Pixels, the Shopping Channels access needs to be given to the sub-account too.
-Shopmatic World
This gives access to apply for a Shopmatic World listing.
-Store Discounts
This gives access to create, manage or disable store discounts.
-Shopping Channels
This gives access to manage the shopping channel tools that are available to use.
Example: Enabling or Disabling Facebook Business Extension, and further management of the Facebook Business Extension.
-Chat Facility Enablers
This gives access to manage the chat functions on the webstore.
Example: Enabling WhatsApp, or Facebook Messenger.
4. Settings
-Payment Section
This gives access to manage the payment settings on the webstore. To enable, edit or disable payment gateways, Cash on Delivery, or Offline Payments.
-Taxation Module
This gives access to manage the Store level tax settings.
Please note: The tax settings on this page, impact the Shopmatic invoices that are generated to the main account. If the tax details are removed on this page, then Shopmatic to Seller invoices will not show the seller tax registration number.
-Store Settings
This gives access to manage the type of store, to enable/disable commerce, to allow only orders, to accept payments, to accept payments and to charge for shipping.
-Invoices Module
This gives access to manage and view all new and existing invoices that have been sent from Shopmatic to Seller.
Example: All transaction fees that have been generated and sent to the Seller will be listed on this page.
-Additional Services
This gives access to enquire about the additional services that are available in the respective markets.
Example: In India additional services such as Cataloguing and Digital Marketing are available
-Multi-Currency
This gives access to enable, edit, and disable the multi-currency feature on the Shopmatic platform.
-Shipping Section
This gives access to enable, edit, and disable the shipping partners, own shipping and self-collect options.
-Domain Module
This gives access to manage the domain settings page, where a custom domain can be connected to the Shopmatic account, and also, (depending on the market) where a custom domain name can be purchased.
-Billing Information
This gives access to manage the billing details of the Shopmatic account, the ability to move from a Transaction plan to a Subscription plan and vice versa. To update the payment details from Seller to Shopmatic and etc.
-Financial Services
This gives access to enquire about the financial services that are available in the respective markets.
Example: Our banking partners provide services to create a new current account, and or apply for a business loan. In India our banking partner is HDFC.
-Instant Orders
This gives access to manage, and place an order through the Create Instant Orders feature available on the Shopmatic platform.
-Multi-currency
This gives access to manage the various currencies displayed at the webstore and Checkout page. The product price will be displayed in the currency selected by the buyer.
-Wishlisted Products
This gives access to view the list of wishlisted products by the buyers.
-Google Shopping
This gives access to integrate Google shopping feature as well as to view a list of products uploaded in the Google merchant center for listing approval/rejection.
How do I enable this feature?
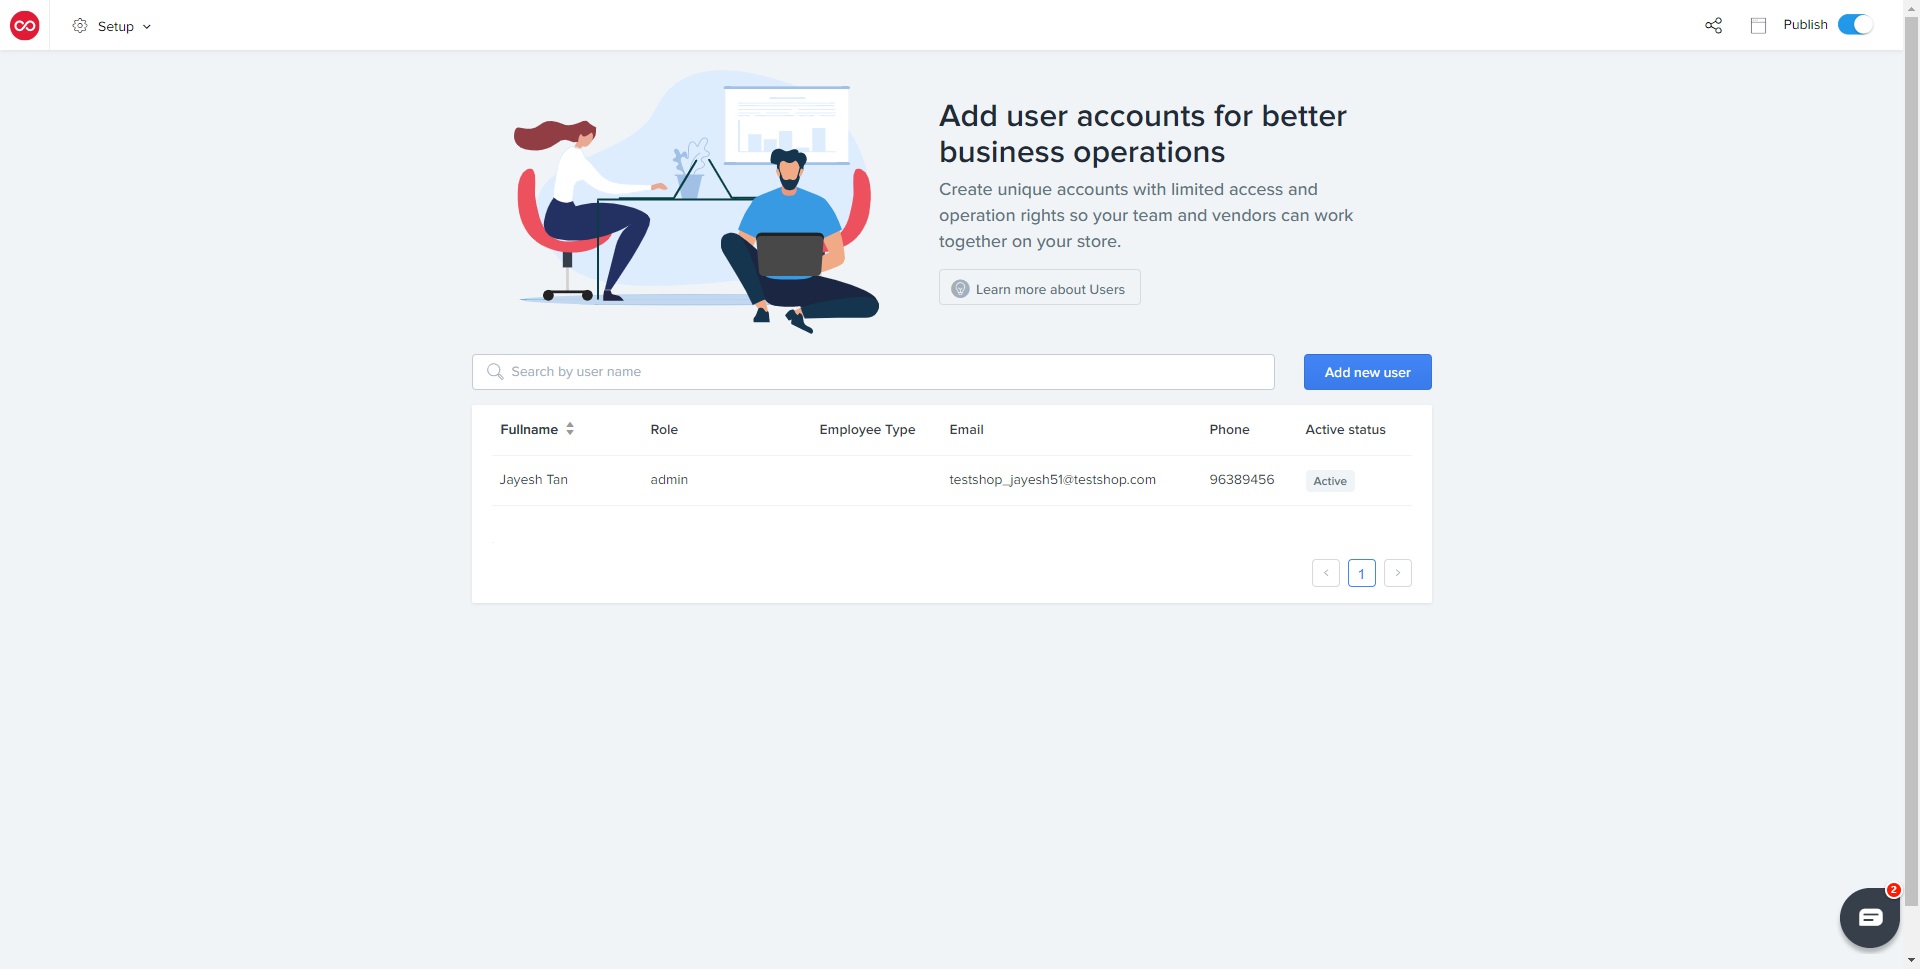
1. Login to your Shopmatic account, from the main drop-down menu, click on Setup, and then on Users.
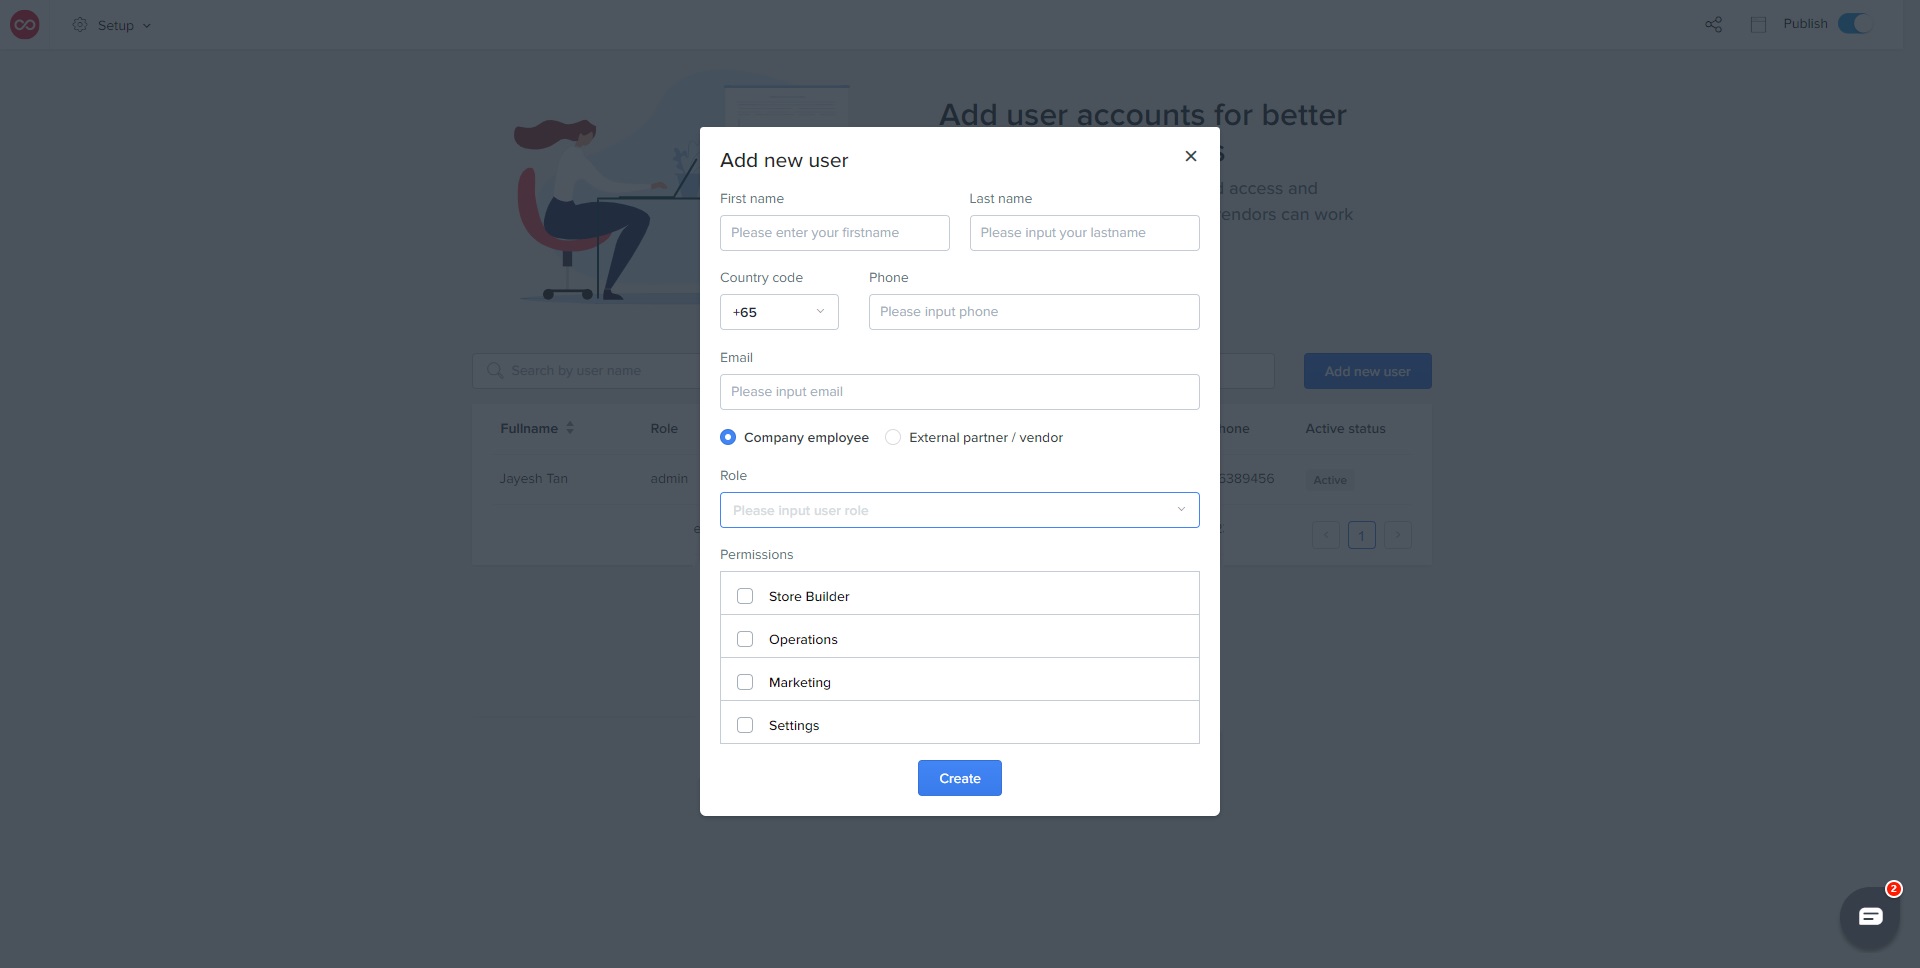
2. From this page, click on the ‘Add new user’ button
3. A new window will appear, enter the sub-account user details such as:
i. First name and last name
ii. Country Code and phone number
iii. Email ID (Please ensure that the email ID and phone number have not been used for another Shopmatic account, either as a main account or sub-account)
iv. Choose whether they are an internal employee or an external partner/vendor.
v. Choose the role that best suits the user profile
vi. Start selecting the different permissions that you would like to give the sub-account access to
vii. Click on Create!
What happens after a sub-account has been created?
The sub-account user will receive an email to activate their account. They only need to set up a new password and will be able to login to your Shopmatic platform (myshopmatic.com) using the same email address and the new password that they have just entered.
Only after the sub-account has been accepted and activated, you should add another sub-account user.
Please note: All sub-accounts will not be able to access the Multi-user feature.
Can I edit a sub-account after it has been activated?
Yes, simply click on the user name, and you will be able to customise their permissions again. If you wish to pause access to a sub-account, there is an Active and Inactive radio button on the bottom left corner too.
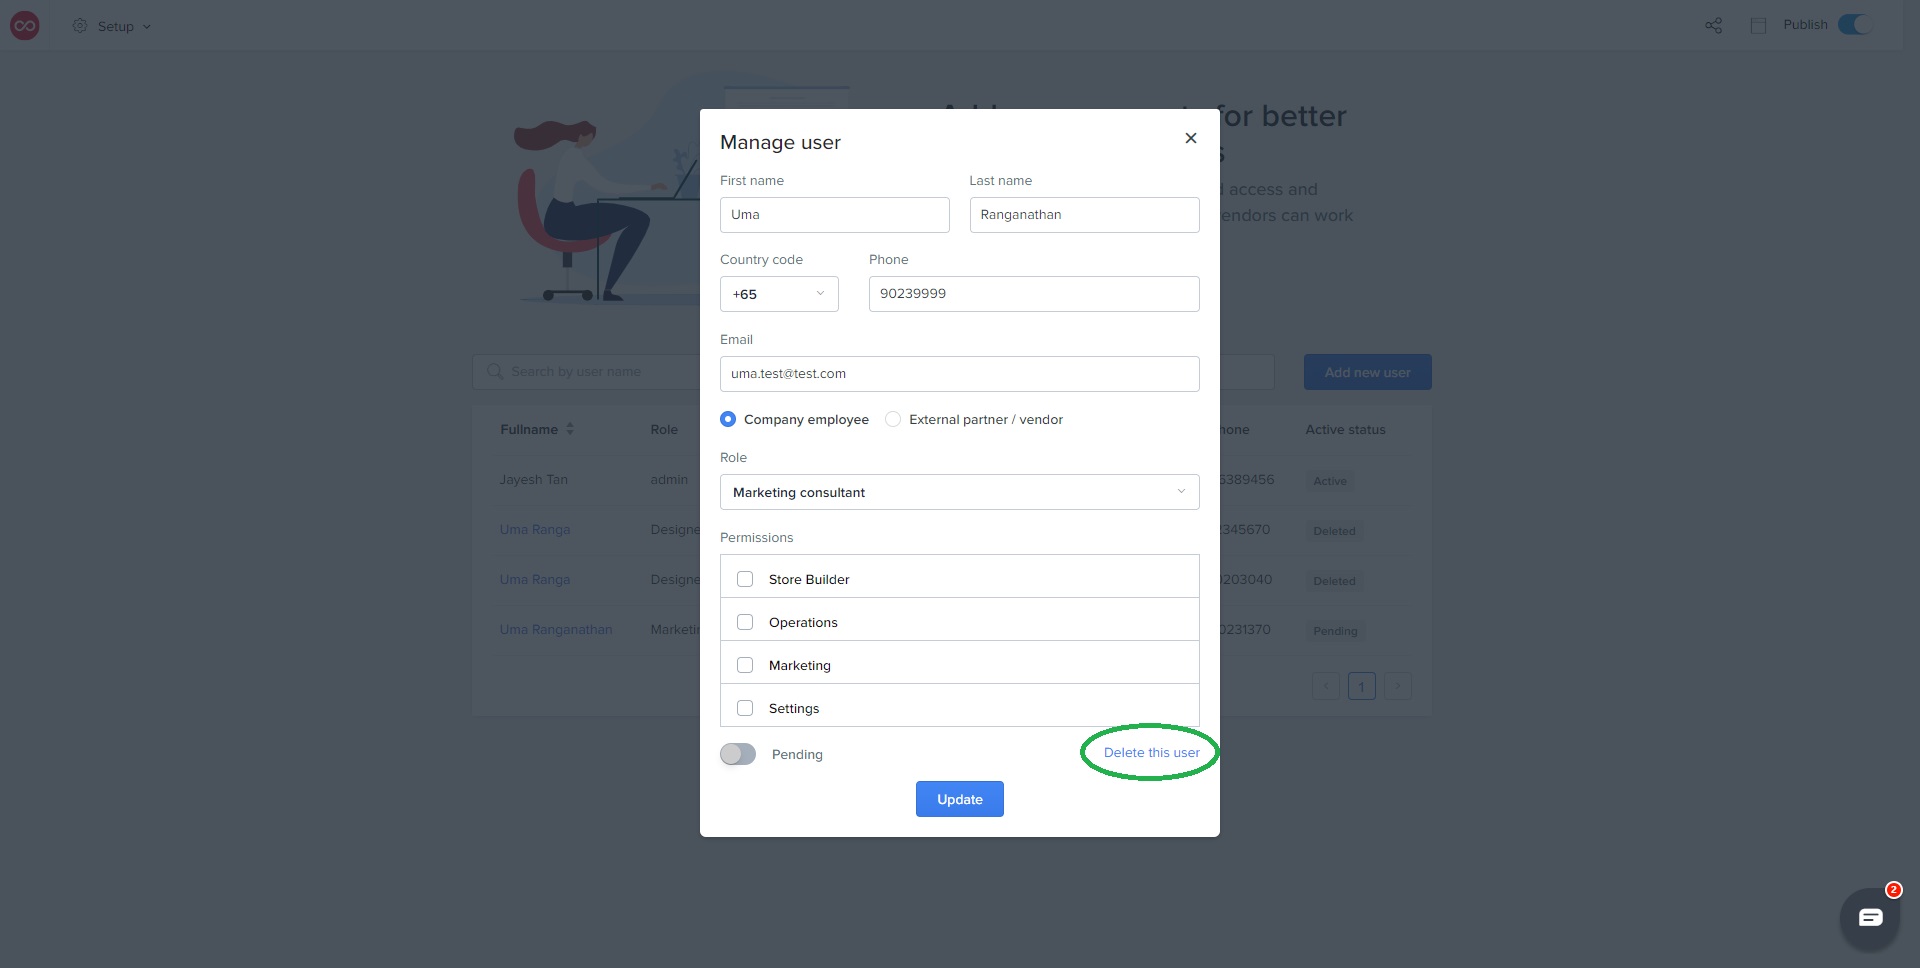
Can sub-accounts be deleted?
Yes, simply click on the full name of the sub-account holder to bring up the edit window. From the bottom right corner click on ‘Delete this user’